You are required to attend class whether on tuition assistance or not. Whether you know the subject or not. Failure to attend the required amount of classes may r4esult in a drop from the class. The instructor is required to indicate attendance to the school through various reports. For those on Financial aid: if your aid is dependent on attendance, make sure you attend.
You are expected to be on time and attend each class till it ends. Excessive lateness or early leaving will be noted and may be considered as absences.
Tests are assigned with an end date indicated. You are expected to take each test before the end time. Failure to do so will involve some type of penalty. No tests (or class assignments) will be accepted after the instructor has submitted his final grades to the school.
Books are assigned. Our book will be mentioned later. You are expected to buy the book during the first week. This is regardless of tuition credit or reinbursement issues.
The instructor is not responsible for protecting your tuition assistance. You will receive the grade earned for the class. If there is a need for a certain mark per your aid, make sure you earn the grade needed.
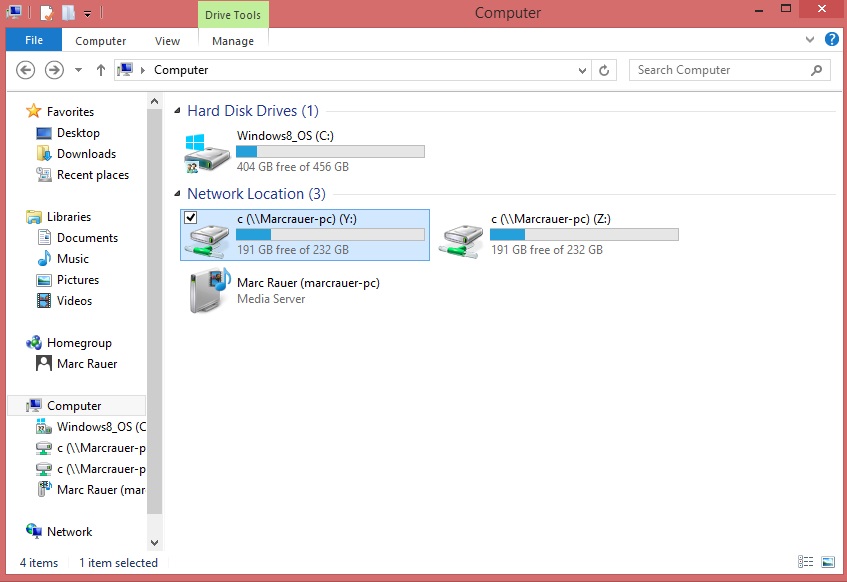
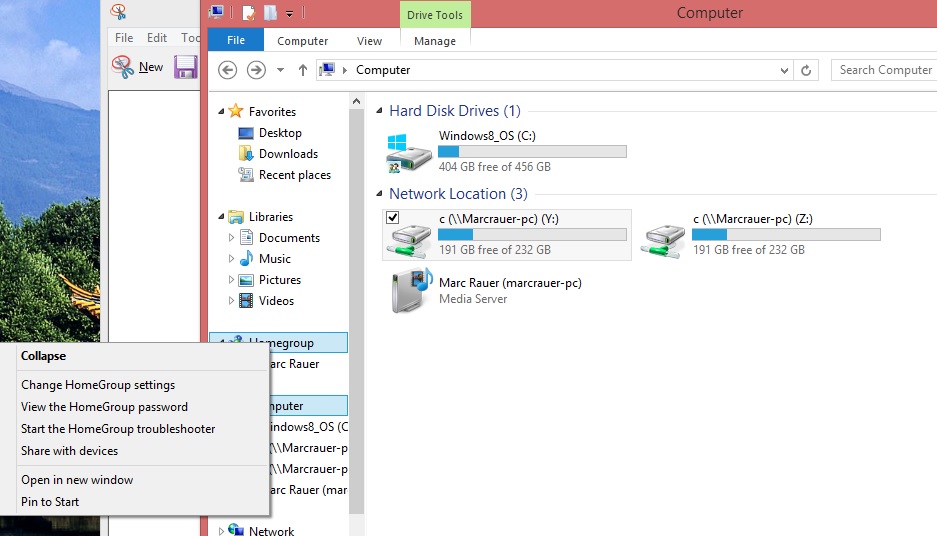
Last week, the final thing we looked at was trying to do a wireless network using two laptops running the Windows 8 operating system. It's a shame, due to illness, that your instructor was not thinking well. We were doing something called peer to peer networking and WIndows 7 & 8 uses a mechanism designated as homegroup to achieve communication. The pictures below show what we should have done in last week's class.

First thing to do today: Let's enroll someone on the snap2010 website at www.snap2010.emcp.com. For our class, the password to tie you into me is fanning-duplicate. The best way to deal with this is to copy and paste this information into the question asking for this ID.
Next, let's discuss the Word 2010 section of the book starting with Word section 1, Activity 1.1 6.
Let's start with the "objects" of 2010 MS Word. Below, we can see an annotated version of this:

We'll discuss these section on detail even though much of this nay be obvious to many of you.
Quick Access tool bar is available through the file screen and options. It allows the user to set up icons for common activities.
File tab shows another screen
Tabs: Each tab handles different controls on the ribbon
Ribbon: A device to allow users to see all controls for MS Word
Ruler (horizontal and vertical): A device for the visual manpulation of tabs and indexing
Scroll Bars: Become available when Word senses that they are needed.
Title: This is a derived Windows object. In Word you get a document name or a default using document xxxx
Status bar: Display info that you can choose by right clicking the bar
Views and zoom. Of most inportance is the zoom possibilities
Word processing buffer: Where you type your document.
Next thing to discuss is the question of paragraph vs character. A character is a typed key. A paragraph is when you hit the enter key. Commands are broken down between character commands and paragraph commands which you can somewhat determine by the home tab. Clipboard, font and editing are character. Paragraph contains paragraph commands. Styles can be one or the other.
Let's take a look at some of these commands including hide/show.
Let's type in the text as indicated in the text.
We should end up with the following:

We are going to save this document. To do so you need to use file. Clicking the file tab shows the following.
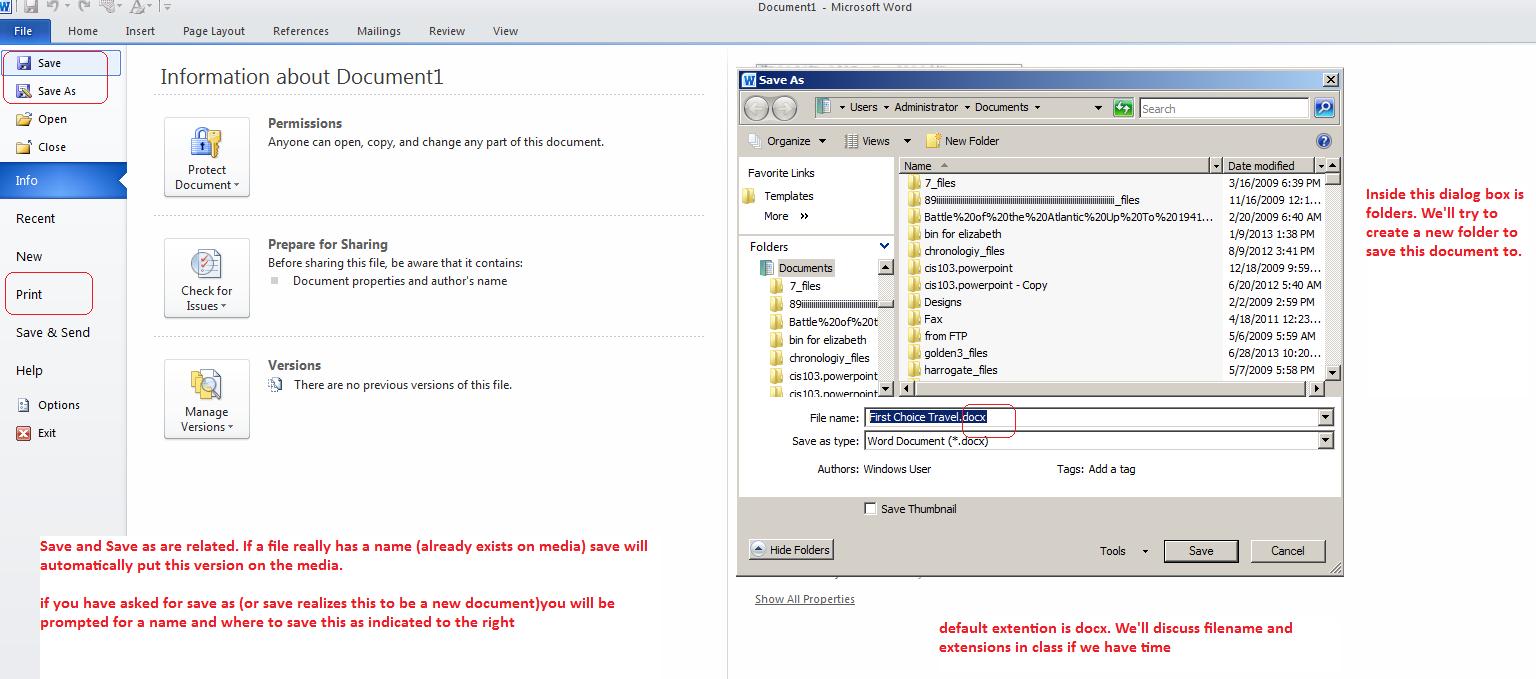
Let's discuss save and save as. We are in a save as position here. What does that mean. Let's discuss this in class. We can also print this document out. Let's discuss that which will include the question of print preview. If we print in class, put your name on the paper so you know that it is yours.
I have indicated the question of extension. Filenames are made up of name [.] extention. The extention indicates to the operating system that this is a Word 2007/2010 document. We will attempt to create a new folder and save to that location.
This is not the document to deal with navigation. Let's hold that to a larger, multipage document. But we should dicuss cursors. Word supports two cursors, mouse and text. The text cursor is represent by an I. Clicking at a location moves your text manipulation to that spot. Depending on how you have set the system allows for insertion or overtype. I am not a big fan of overtype. You can get ino sedrious trouble with it. But, below we show how to achieve this

Your book discusses spell checker, thesaurus and grammar checking. This is probably too early to do this given the small length of this document. Remind when we deal with a larger one. But we could look at thesaurus. What is a thesaurus in real life? Highlight the word incredible. For thecthesaurus to work proerly you need to select a word in your document and incredible will do. Click thesaurus and a panel to the right gives you some options. Word allows for more than this. Go up to where it indicates thesaurus: English and click and select Bing. Notice that you have invoked the internet search possibilities of Bing. This is the research icon on the review tab.
Word has a great way of undoing and redoing. This is part of the quick access toolbar components. At the moment we can move back and forth as your instructor will demostrate. Undo and redo answer the question of "What do I do when I've screwed up." Easy answer: relax and begin to click undo or ctrl z.
For July 18th's lecture, let's start with the document that we were working on at the end of the last lecture. You can pick this up by clicking here.. Several things remain to do in activity 1 of Word.
First, let's save the file. In picking this up at this moment, you downloaded the file from a site on the web. Save and Save As are used to move data back and forth from your disk or personal media. The third image above was developed to show you how save and save as works and we will reference that as we lecture.
We will also discuss printing which is in essence saving to a different device: your printer. Again we don't want to become too technical here so we'll do a quick pass for printing. Remember, before printing, put your name on your document to distinguish yours from the others in the class.
We want to look at finding things on our document. In this version of word, there are two finds. The first, which is invoked when you click find on the editing group of the home tab, looks like an internet search. Below we show this as we search for the letters the. Notice that there are four matches although one is the the of then.

There is a find with more options. Click the control next to find and then select advanced find as indicated below. Choose more and you can see a set of options including finding the search as a whole word or considering the casing of the search. This option displays the matches as the program moves down the document.

An addendum to find is to replace. Below we show the replacement of the letters first with second. Besides the options indicated with the advanced find, one can 'gang' replace (replace all at the same time, replace one at a time and run the replace as a find.

Your book discusses views and deals with zooming at the same time. Views are not as meaningful in Word as they were at one time but Full screen Reading is what you first see when opening a Word document as an attachment. Web layout allows you to see the document if it was a web page. You instrcutor has used this since an option of saving is to save a Word document as a web page (.htm). Word has an extensive outline capability and you can move into this by the use of outline. Draft shows the document with limited graphics and no margins. We have talked about zoom previously.
In one of the images from our last class, we indicate overtype and if I remeber, we will show you how this works at this point with the warning that overtype really is not as useful as it sounds.
At this point we arec just about done with this section. In the back, is a section designated as skills assessment. You should try all the assessments this weekend to hone your skills.
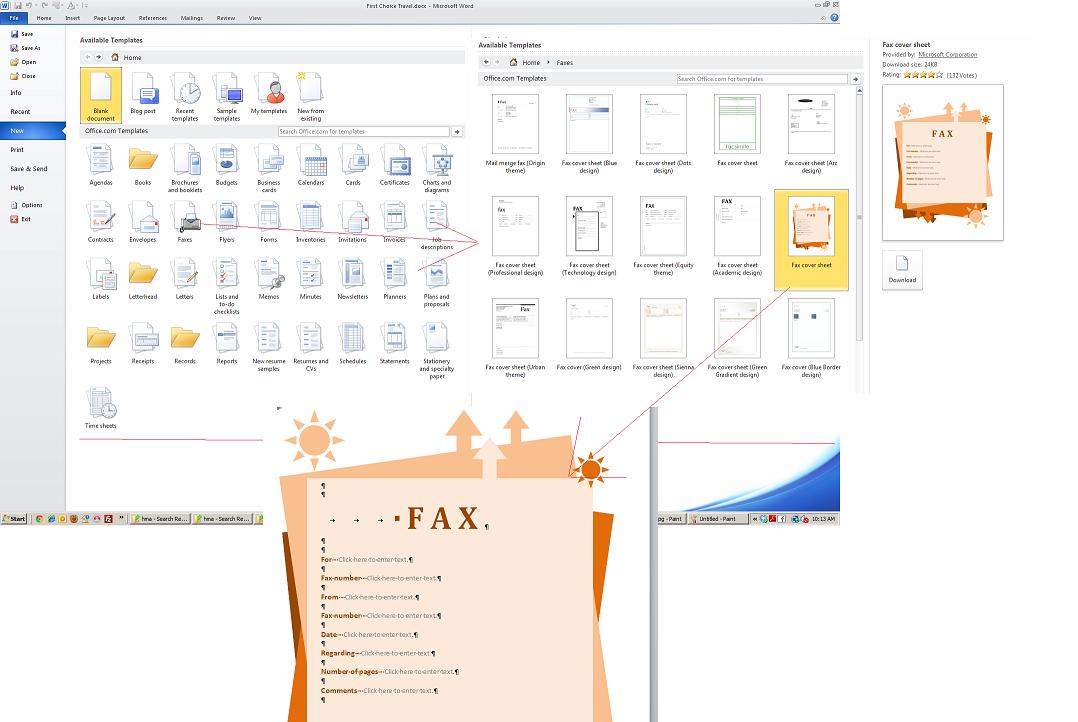
All documents start with templates and Word has increased the utility of these over the years. let's say we want to create a fax cover sheet. We can do this through Word. Below, we document this and will do this in class
Let's diverge somewhat from the book. The authors go into activity II and are using another file, but we can show the properties of paragraph commands quite simply through this example. Underneath the address block, repeat the address except this time use the enter key. You should have something that looks like what appears below
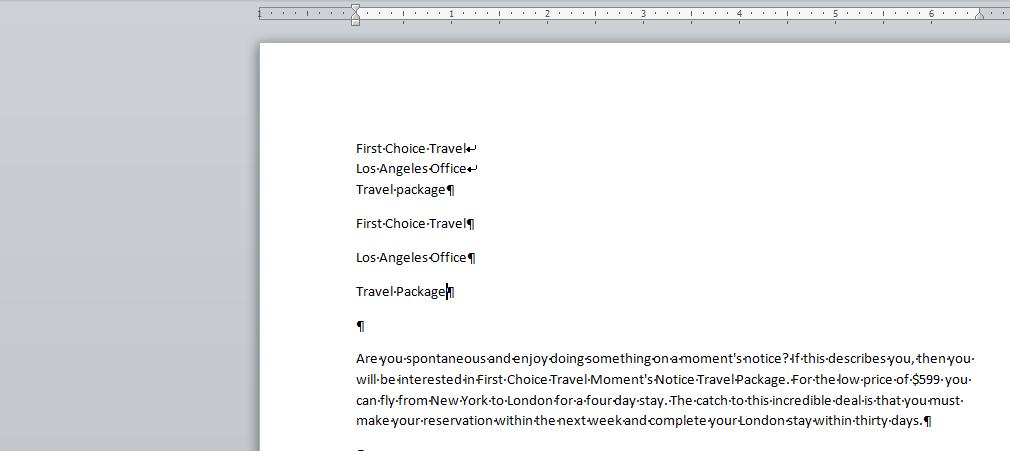
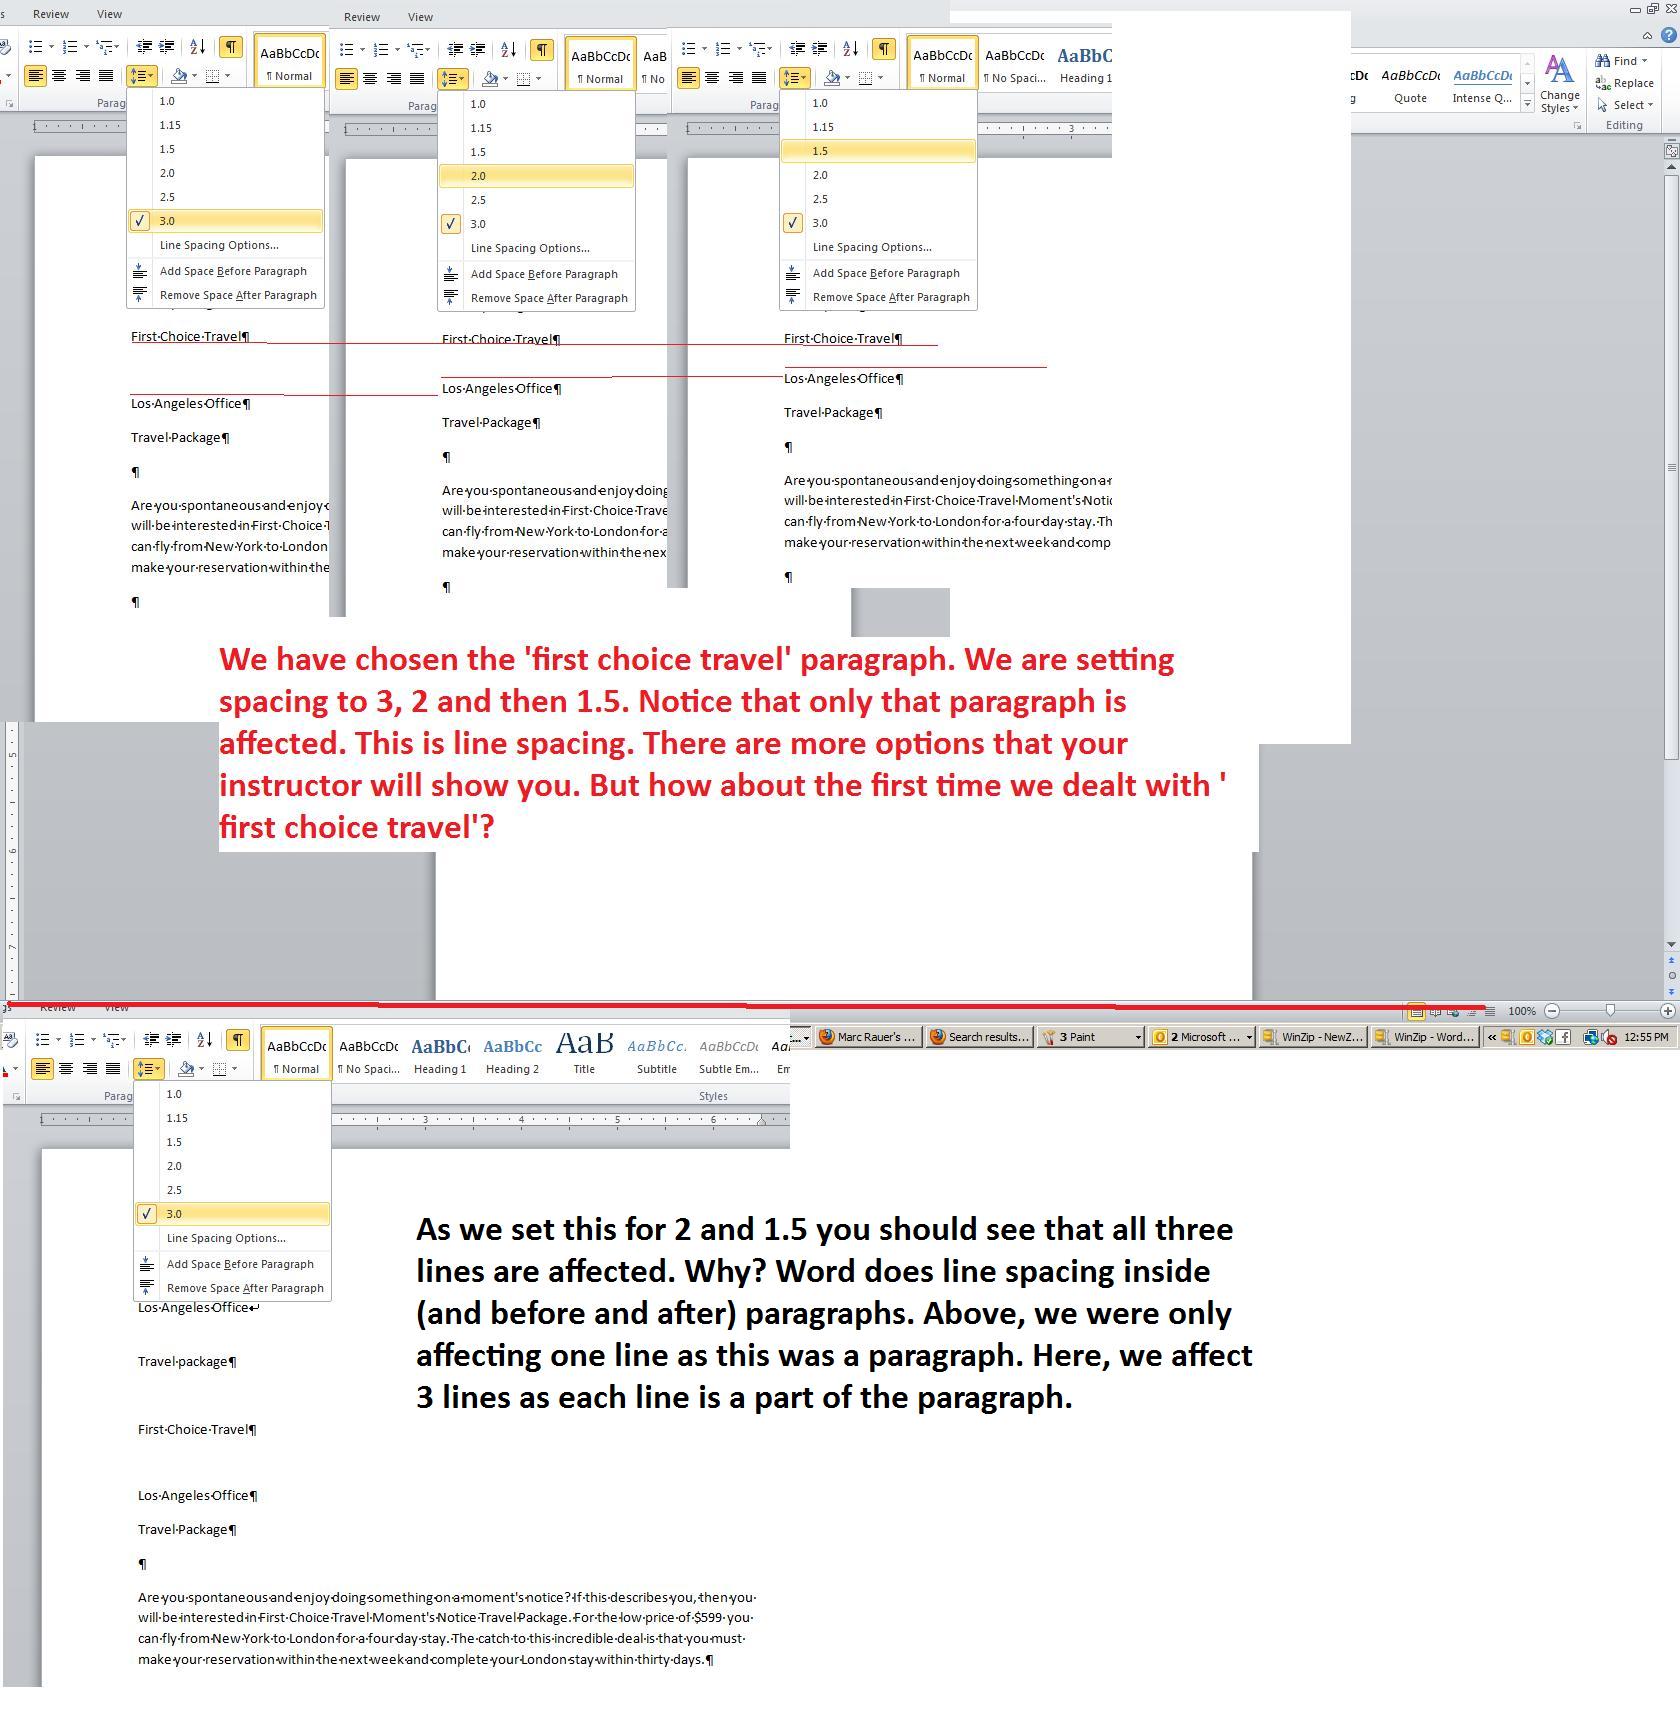
Our intention is to play around with spacing both inside, above and below the paragraph. Your instrcutor will show you the location of this command within the paragraph group. Working with both the first address block and the second address block, you should be able to see the differene between the effects of paragraphs and the effects of non paragraph breaks. Below is just one part of our exercise.
Notice that this document is two page long. With this length, let's look at navigation again. Besides what we dealt with, let's use a device called Goto to move between pages and also to move between lines. And, search will make more sense here. Let's look at the string of chancters oslo.
Now, let's go back to the book as it describes the commands of the font group on the home tab of the ruler. We will alo use another tool of Word, preview.
For the rest of the class, we are going to use the OSLO document which you can access by clicking here.
The book is about to give instrcutions in the use of the Font group and paragraph group commands of the home tab of the ribbon. This is the core of the character commands versus the paragraph commands discussion of your instructor. You saw the question of preview in class last session and most of these commands of these groups allow for this. But before dealing with commands of these groups, you can always see what's going on by using the reveal formatting panel using shift F1.

Panels are fixed at sides cof the screen. We saw a panel for the new find command. Similar is this one. Panels have an x at the right corner that can be used to shut it.
Last session we looked at the question of point size. Notice that the increses (decreses) are of a pattern. In the case of Calibri notice how we move from 8 to 9, 10,11,12,14,16,18,20,22.24.26.28.36,48,72. You can move up and down using the A^ and a^ commands. Select a sectioon of the text and try it.
We discussed different cases in a prior session and you can see this in Aa^. The artful one is toggle case which we show below.

Continuing on, use the B and I command for bold and italic. Not that it means much but these are fonts (or font styles). The system indicates how bold, italic or bolded italic characters should look like just as it does in terms of a regular character. Let's also look at color as indicated below.

While not part of the character group, we will discuss the format painter - and example is below. We can show both the click and double click of format painter in class. Understand that format painter is a variation of styles which is discussed at the end of activity 2

Now we are going to take a look at the paragraph commands and these include aligning and indenting, tab sets, borders and bullets. We will do this in class.
At the end of the chapter is a discussion of styles. Let's use a new document for this
We can access what was done last class by clicking here for the oslo document. This is the original so changes made last class are not shown. We were in the process of dealing with bullets and number. Below we show the use of a picture as a bullet. You can access the picture by clicking here.

Notice how the specific paragraphs were used. This is an example of advanced slection using the control key. In addition we can use number to replace bullets as indicated below

There are two ways of applying large formating options at once to your document. The first way is style where pre-selected formatting options are condensed in one click. This is the styles group of the home tab of the ribbon. By the way, the picture below showing the style itself and the way to modify it, also shows something indicated in class: notice the number of styles visible as my screen at home is of a higher resolution than what we have in the school.

A kind of quick use of style is the format painter. This can be used either with one click or a double click. The format painter "reads" the formats of the original text (what we saw when we clicked shift f1) and applies this to selected text while the format painter is in operation as indicated below.

This should handle the home tab as far as this class is concerned except for the question of cut, copy and paste. At the minimum, we can use this to manipulate text between documents although if we have time I will show you some more advanced features of the clipboard which is the system device used for this feature. The book uses two new documents to indicate this and we can access a discussion of Thailand by clicking here and some other info on Thailand by clicking here.

Activity III of wWord discusses background color of a page and theme. Quite frankly this is not the place to indicate theme and at a future time I will indicate this to you if it seems appropriate. The picture below shows how to apply a picture (this is of 5 Thai girls) as a background. One can also use a straight color, a texture and a gradiant all of whaich we will show you. The picture can be accessed by clicking here.

A better way to handle pictures in the background is to use watermarks. Watermarks were a physical imprint on paper in the old days and you can emulate this by picture or text. Below, we will use the same picture with and without washout. I think you will agree that this is a better answer.

A important issue has to do with margins. Your book indicates how but in class let's discuss why? Margins can be modified in two ways: through the ribbon or the ruler. Below is the how of this.

We are dealing with the third activity. You can access the file we will use by clicking here for the Thailand document. We have a picture to use which can be accessed by clicking here.. Note also, your word tests are ready. Two tests should be available to you at 9 tomorrow (July 31) through August 7th.
We are about to deal with Microsoft Word contained templates. You can alter the template in terms of the information it holds by entering information as meta data. Below, we access this section of the program to add underlying info about the document.

There are two ways to enter headers and footers. One is by template - new to the 2007 version of Wrd - and the other is by the traditional piece by piece way. Below we show templates. We will not go into this, but Word allows for left and right page (odd and even) and first page so this is why you will see odd and even components.
 You can put page numbers into the header and footer through the appropriate icon. Below you can see an example but we will do some others in class and show you how to do this in the actual document.

One of the insertable objects is clip art which works similarly to entering regular pictures. Clip art at its fundamentals are caricultures. Position your cursor where you want to place the clip art. Click clip art on the insert tab of the ribbon. A panel is opened to the right. You can pick up clip art per themes and below we show Thailand based clip art. Clip art, like pictures, enter your document in line with text which means that Word considers this to be a very large letter.

There arew two ways to resolve the picture into your document. Two controls can be used. Wrap text and position. We will go over the options of wrap text for this clip art. Position can be shown when we add a real picture.

Pictures are images brought into the document from media. I've included a firedance picture from a Thai beach. The picture comes in from the disk in line with text. Let's first use position to see what that does and then formalize the pictures location.

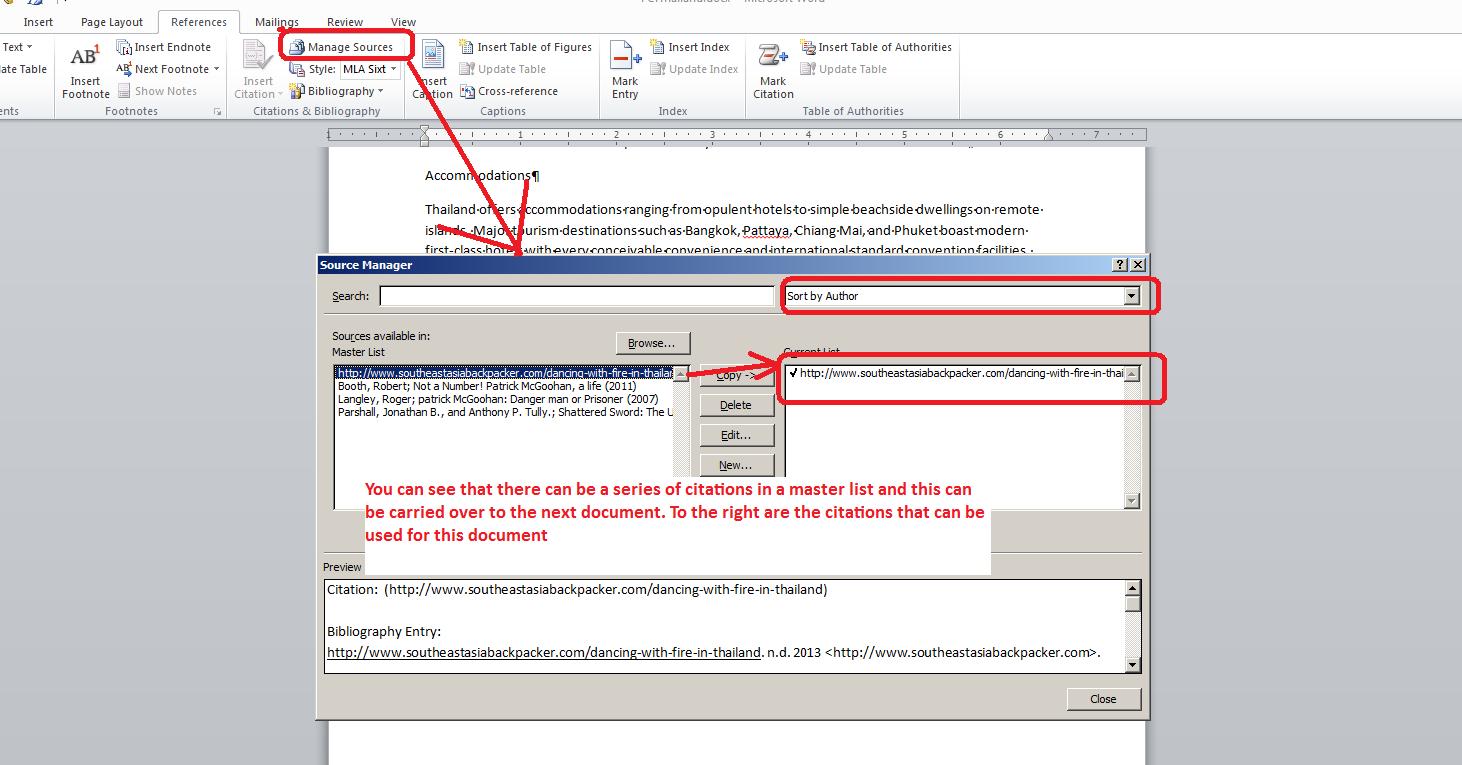
The tab references contain the academic sensitive controls that Word provides. One new feature from 2007 deals with references known as citation. The entire group of Citations and Bibliography can be used for this. In our case, we will cite a web site location: http://www.southeastasiabackpacker.com/dancing-with-fire-in-thailand. Let's use insert citation to make a note of this.
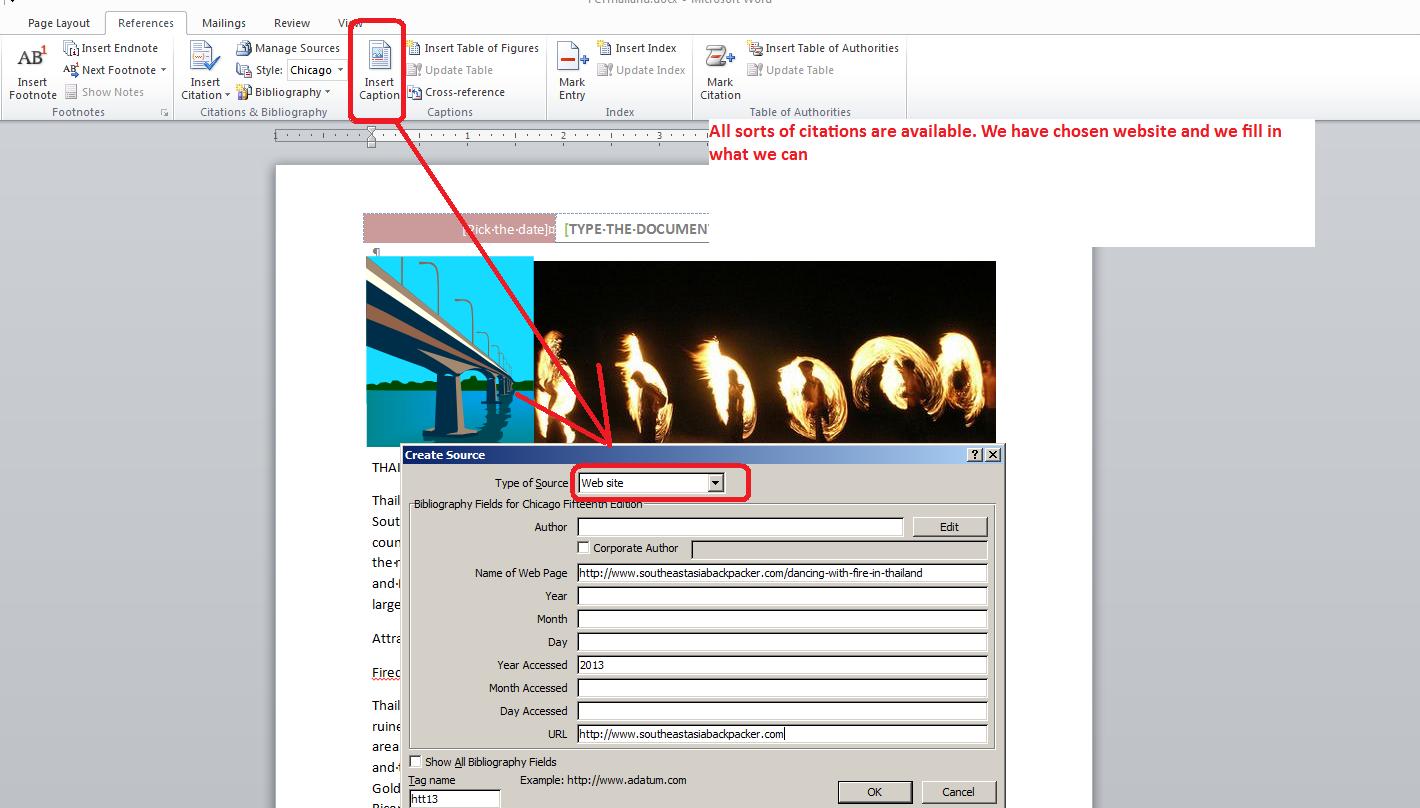
To print out your bibliography (or works cited) follow what is done below.

Once your citations are set, the questioin of what style to display them comes up. Different disciplines use different styles and we show this below.
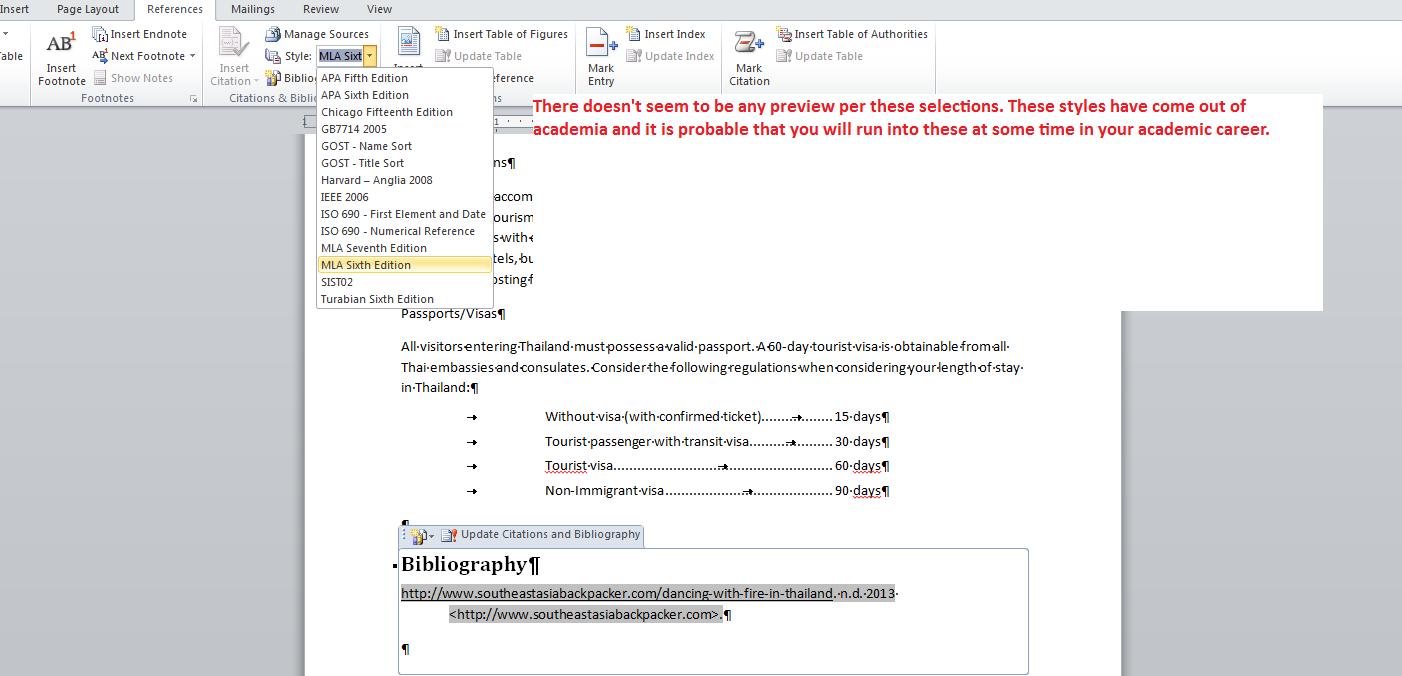
Word can allow you to create a virtual library of references. You can forward references to the next document as indicated below. References are part of the normal template and you need to agree to changes in the template structure to save this.
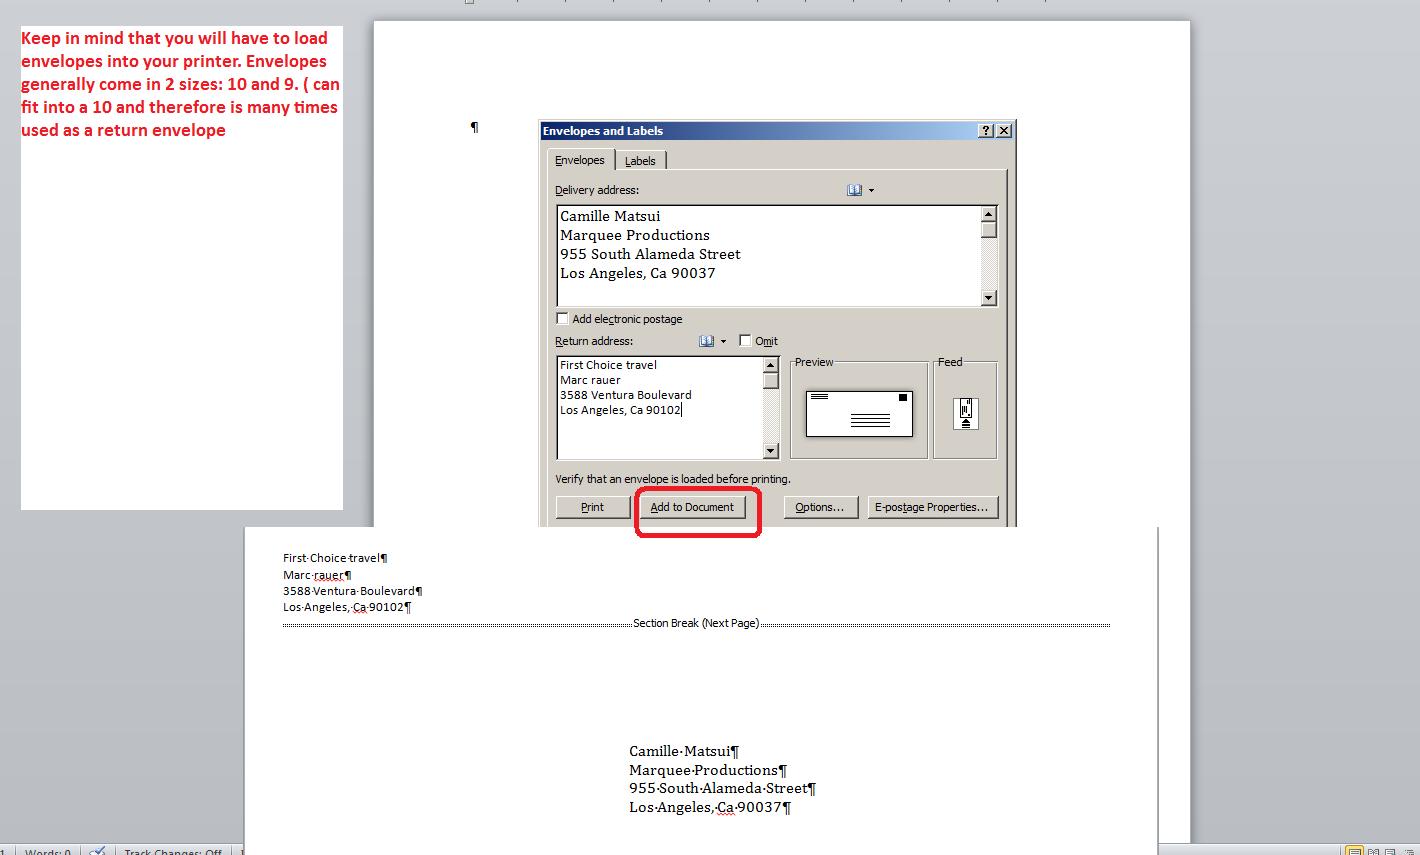
The end of Activity 3 deals with the creation of an envelope. This shows a creation of one although in real life the creation of a list of enverlopes is usually requested.
Your test is in operation as I can see it. I don't know if the student from the Spring clas will show up to explain what I can tel you. Those not doing the test by 1PM on August 7th receive a zero for that part. You have two word tests. Each one should alow you to take it thre times. I could the highest grade. Each part is worth 20 points - therefore your Microsoft Word component is 40 points.
I hope to bring in some history boks and show our clas the use of the references tab in such boks. History books by their very nature need references beyond what is supplied by Word but this wil be a start.
For the next wek and a half - up to midle of Aug 8th - we are dealing with powerpoint. We can use my notes although you have your book to also reference.
And we are onto Powerpoint.
We will be discussing the ribbon structure and then beginning layout which includes a discussion on smart boxes.
We are aiming to a powerpoint presentation which includes animations. You can access this powerpoint presentation by clicking here.
To do this powerpoint presentation we need 3 pictures which you can access below


First we need to discuss this
All right: Let's try another. This is more consistent with previous class content.
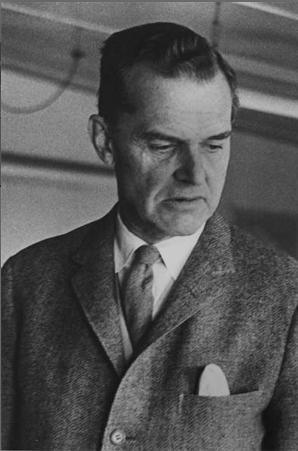
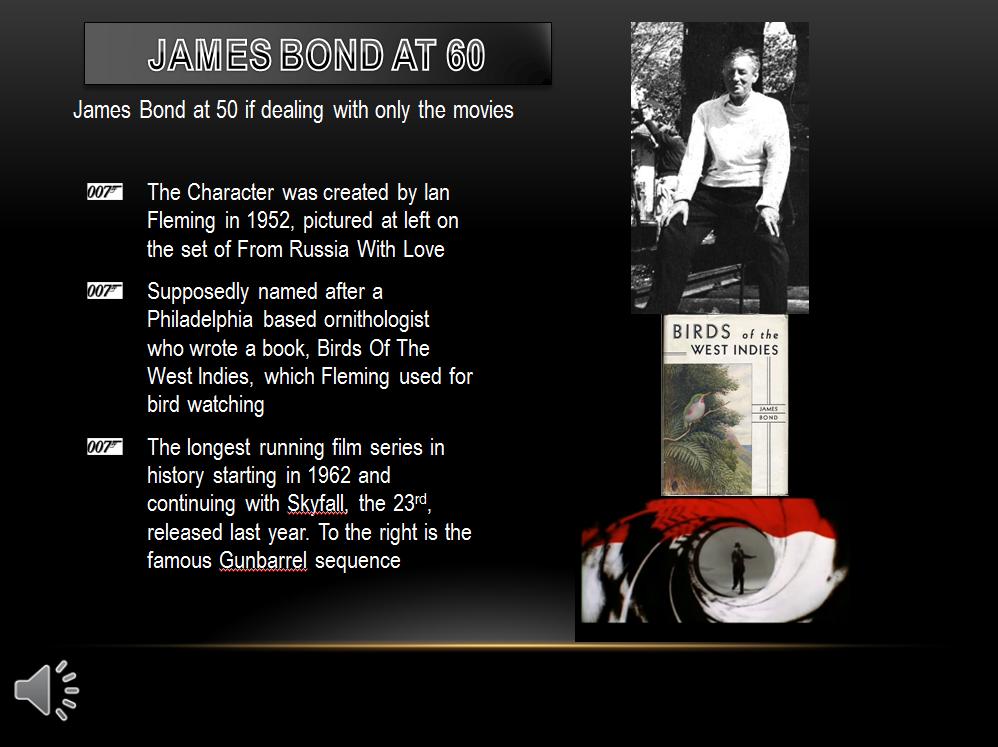
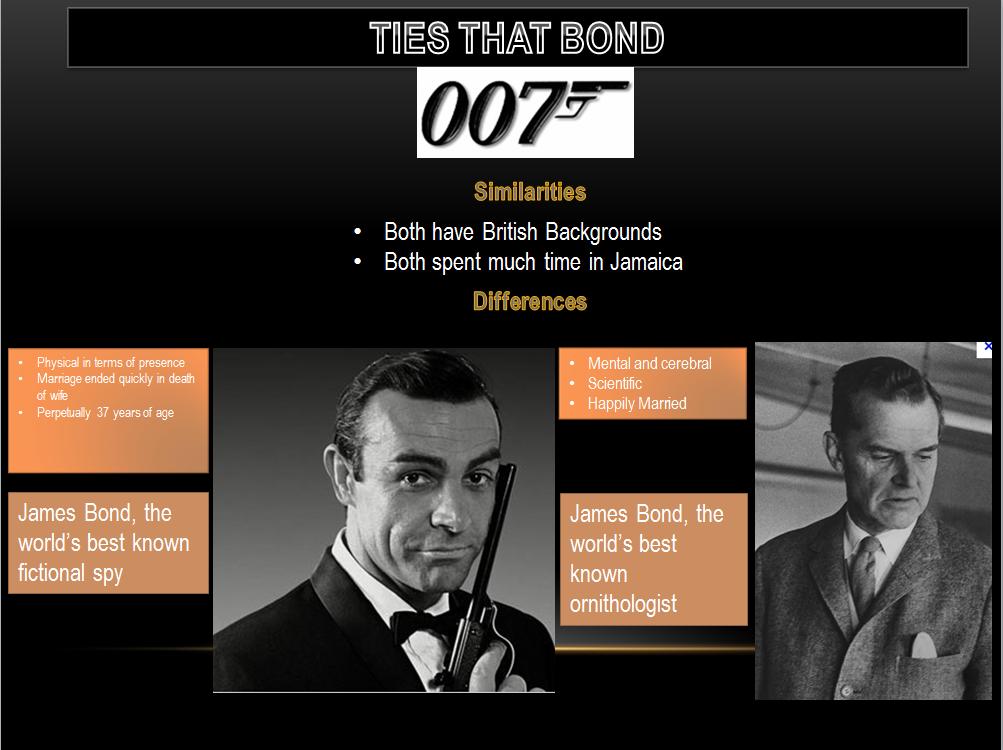
Now, let's deal with the second smart box and insert a picture. I know you will be shocked, but your instructor has been studying the life of a former very prominent Philadelphia area resident who wrote the famed book, Birds of the West Indies, in 1936, later reissued in 1948, 1960 and 1999 whose name is James Bond. Surely you also have read these books pertaining to ornithology. He was a very famous ornithologist and worked for the Academy of natural sciences. Of course, it's possible that you may have run across the name 'James Bond' in another capacity and, while your instructor doesn't think that this really is true, there are some that believe that an author used this name, given that the author was a birder and was familiar with these books, when he went on to write a set of books involving a character who dealt with espionage. You can access the Philadelphia, James Bond's, picture with that certain author, Ian Fleming, whom your instructor also studies by clicking here
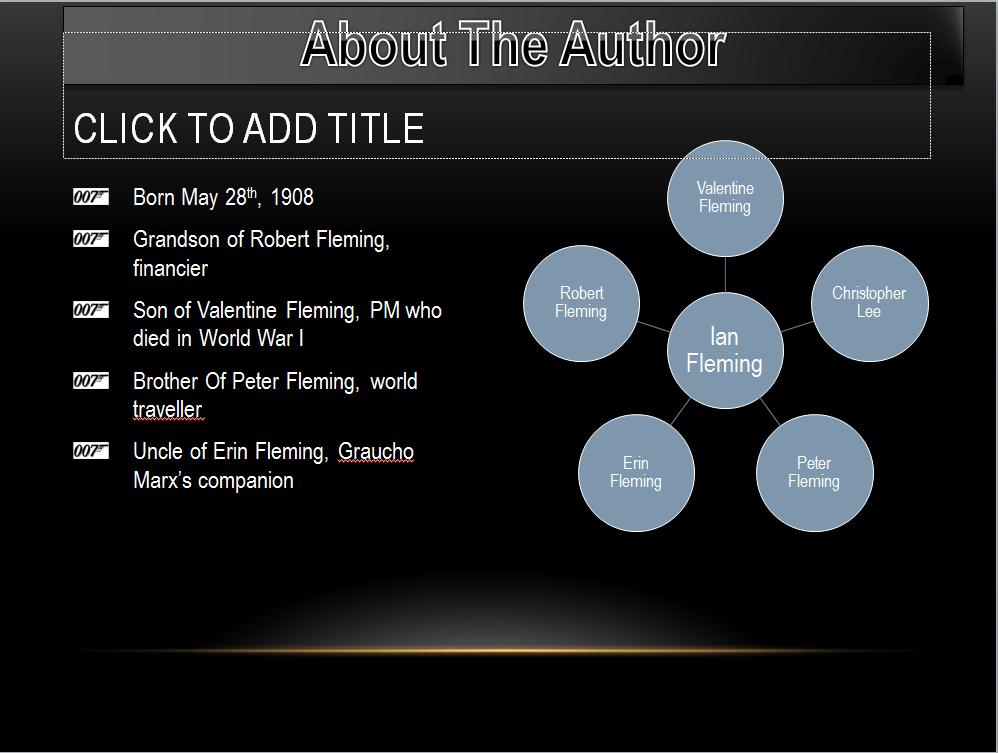
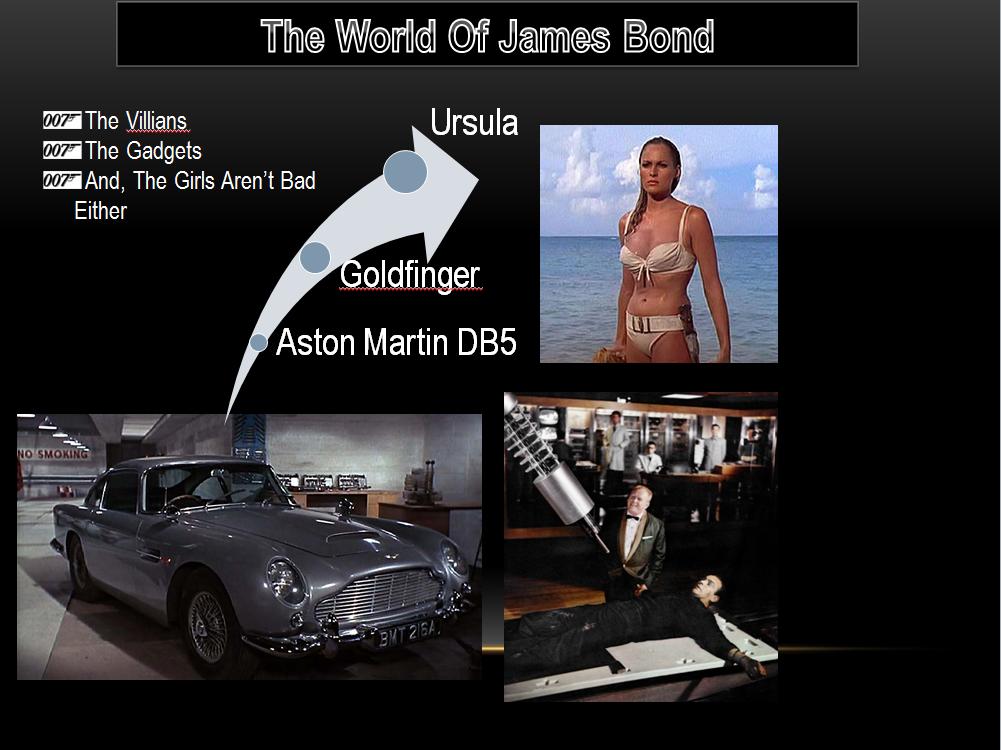
Your instructor will kead you into the creation of a powerpoint slide as indicated below
For our final we want to crate a five(5) slide powerpoint presentation. Below is the 5 slides

The following are the files needed to create this. These are not exactly the pictures used in our examples but they will work.
007logo,gifWe are going to be studying annimation today. You can see this in the full demonstration of this presentation in class. Notice that you can structure this so that it moves with music.
This is a large file, but if you want you can access it by clicking here.
For the powerpoint test we are going to do the Bond powerpoint demo as indicated last session. This time we start from scratch and add the animation. Below are files we will use.
Ian FlemingAfter we are done with out test you will send it to me as an attachment to 777rauer@voicenet.com
And, we move into excel. We'll use one of the book files which you can access by clicking here.
We want to discuss the components of excel. We will go beyond what the book shows inclding the file menu.

For this class data can be entered into a cell as text, number or formula. In class, we will discuss the specifics to this.

We will also be discussing functions. the book excel file we are using has some of these.


A major problem in excel is one of fill and we will be spending quite a bit of time on this. The next two images try to explain this concept.


Formatting of cells can be important although your book is not indicating the more modern way of doing this. The next 3 images handle this including column width.

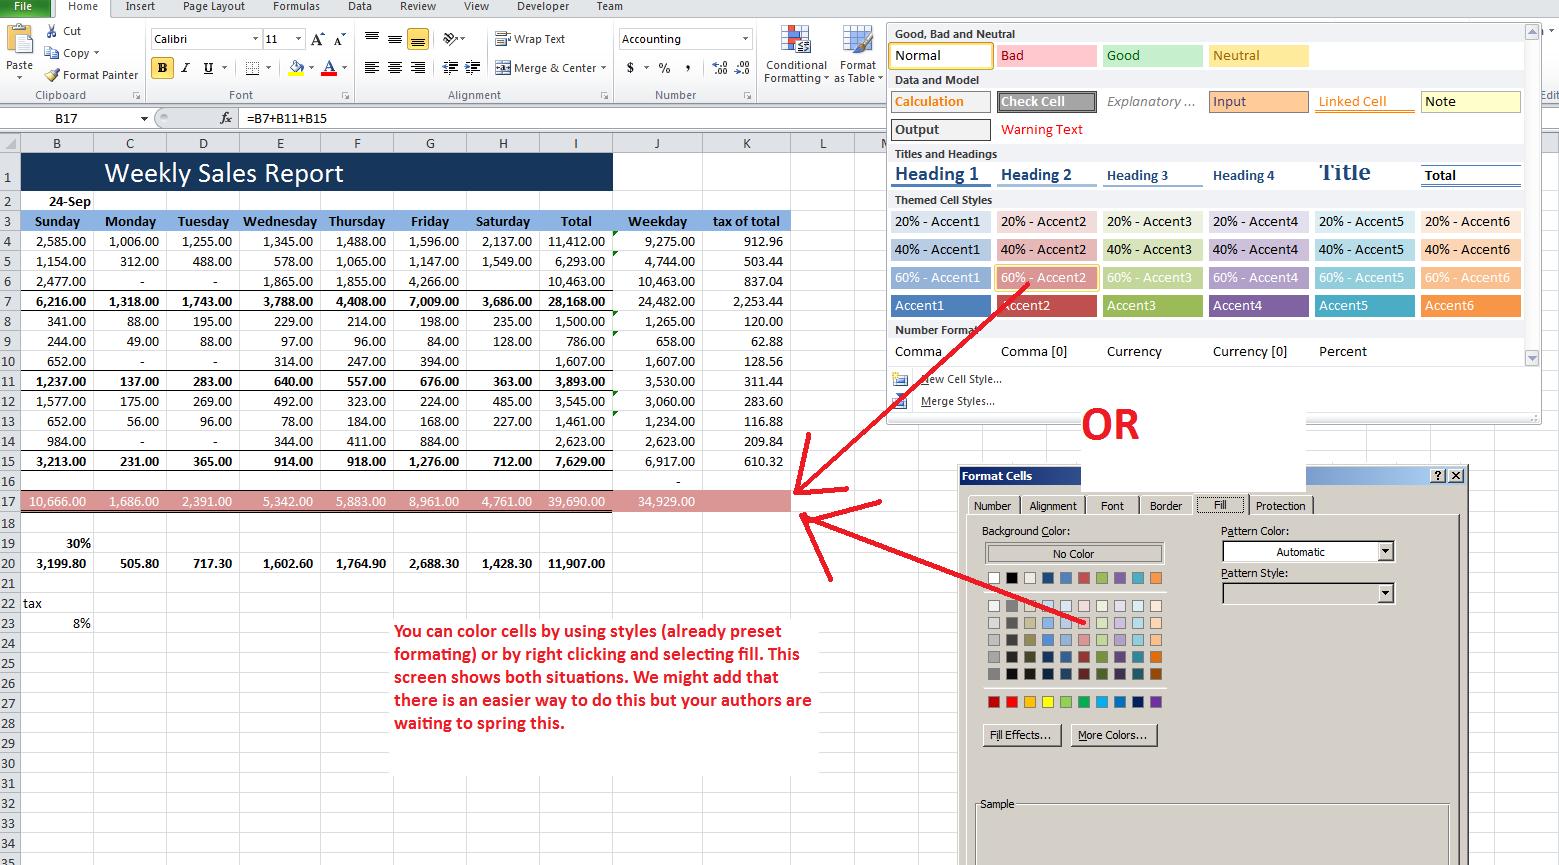

Excel has extensive ways to format number. We will spend some time on this. While you are not responsible, I will try to show you an example of fill with date which is over and above the following image.

To study the questions of charting, sorting and filtering, we need a better spreadsheet. click here to bring such up. Below is how this should look as we start.

You can access the file as we left it by clicking here
Here's where we left this.


There are several ways to sorting. The way this is set you are back to some of the original assumptions. We'll look at all possibilities.

Filtering is very important. Here's an example where we filter out those making less than 600


Sometime you want to change the spreadsheet look dependent on who is viewing it. group and ungroup is perfect for this.

If we have the time let's look at another prolem which you can access by clicking here
There are two problems in your test. The first problem documentation (in a sense) can be access by clicking here.